Turning Unused Attic Space into Usable Storage
October 18, 2010
I recently added three recessed cabinets to my upstairs bedroom to
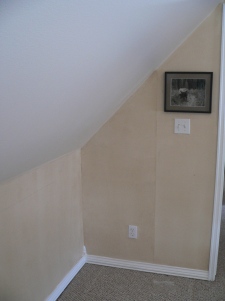
take advantage of some unused attic space behind the wall. My home, like so many others, is sorely lacking in the storage department. The upstairs bedrooms have the roof pitch as the ceiling, with a dormer on one side and a short 40″ high wall on the other. Behind that short wall is an unfinished triangular space where the rafters continue down to the eave.
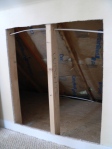
To accomplish this project, I cut three holes in the drywall for three cabinets, centered on the wall and spaced evenly. I then framed out the holes so that the roof would still be amply supported and moved the electrical outlet. I carefully measured each space and built a cabinet to fit it, inserted the cabinet, added face frame trim to sit flush with the drywall, added trim to match the room’s window trim to cover the seam between the drywall and the face frame trim and added doors.
Before starting, I examined the wall I wanted to cut into. There was an outlet in the middle of my wall, so I knew there would be electric wires running back there, but I also knew that the outlet could easily be moved to the left or right of where it was, depending on how much wire I had to work with. I had a radiant baseboard heater on the adjacent wall, but I know from being in the crawl space that the copper tubing runs between our floor joists. I also knew that the short wall I was going to cut into was supporting the rafters at least partially, so since I would be removing studs for the cabinet openings, I would need to transfer the weight of the roof to sister studs at the openings. (For a smaller opening, one could make it between studs – they are set at either 16″ on center or 24″ on center – but I knew I wanted my cabinets wider than that.)
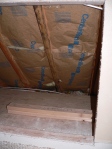
Remember that I said the space behind the wall was “triangular” because of the pitch of the roof? This means that because of the depth I needed the backs of my cabinets to slant to match that angle. If you think it would be a good idea to cut into the rafters so that you could just purchase a standard square cabinet, think again. Those rafters need to be structurally sound to properly support the weight of your roof, and any extra weight that might be on it such as snow, and cutting into them in that fashion would render them unsound.
After thoroughly evaluating my room, I decided how many openings I wanted and where and then took a total measurement of the length and height of my wall. I then drew what I wanted on paper in 1/2″ = 1′-0″ scale. (I used regular paper and a scaled ruler, but an easy way to draw something to scale is to use graph paper.) I wanted three cabinets, so I centered a larger middle one, and then placed two smaller cabinets on each side. I left 12″ in between each to allow room for the outlet I was relocating and the outside trim. I also made sure I had at least 18″ from the corner of each wall to cabinet edge so if I ever wanted to place a piece of furniture on one of the adjacent walls it wouldn’t block access to my cabinets. I then drew the plan directly onto the wall with a pencil and double-checked that the openings were the way I wanted them.
Before starting to cut the drywall, I removed the baseboard trim and used a stud finder to locate the studs so I would know where I was going to have to cut them out. Once the hole in the drywall had been cut and a cabinet inserted, I needed a way to cover where the drywall cut and inserted cabinet meet. My solution to this was to build the cabinet boxes out of 3/4″ thick material, and recess them 3/4″ back in the hole, then place 1×2 (which is 3/4″ thick) flush with the drywall just inside the opening creating a face frame that doors could be attached. Using trim similar to what was used around the windows and door in the room already would hide the edge of the cut drywall. I cut the holes with the intention of letting the cabinet trim go around all four sides of the opening and then notching out the baseboard to run below the bottom piece of cabinet trim. (My room has white painted trim, which made the cabinets easy to match.)
With holes cut in the drywall, I removed the studs that were blocking my openings, and then framed out the openings just like I would for a window or a doorway with a double header and sisters. I also placed a double footer, which means my opening had (2) 2×4’s stacked at the bottom of the opening, and (2) 2×4’s stacked at the top of the opening, supported by (2) 2×4’s “sistered” or side by side to the left and right of the opening. The header needed to be attached with “cripple studs” or short 2×4’s that run vertically from the header to the structure above, which in my case happened to be a 2×4 forming the top of the short wall and attaching it to the rafters. Because of my double footer, the bottom front of the cabinets were (2) 2×4’s high (1 1/2″) off of the plywood attic floor, so I also created an equal support for the back of my cabinet. After getting the studs removed and the openings framed, I moved the electrical outlet.
Now I was ready to measure for the cabinets. The addage “measure twice, cut once” is applicable here. I measured the width and height of the openings and measured in at least three different places to make sure the opening was square. At this point, my drywall and the studs of my openings were flush, so the width and height measurement of the drywall and the width and height measurement of my studs were the same. I also measured the angle of the rafters that would be above the back of the cabinets. To accomplish this, I decided what depth the bottom of my cabinets needed to be, measured to that point, and then easured to the height of the rafters. I repeated this on top. Remembering to subtract 3/4″ for the face frame that will be sitting on the front of the cabinet from the depth measurements, I made the depth a little less just to make sure I didn’t hit anything. My bottom depth ended up being 18″ and my top 6″ with an 18″ high back, which made the angle fit the rafters without touching. I used 3/4″ thick material for the sides, bottom, top and back of the cabinets, and then for the angled back, I used 1/4″ material so it could be easily nailed on.
I wanted to keep my project simple, and I don’t have a lot of special tools, so my choice was fixed shelves rather than adjustable ones so that I could just cut to fit and insert and screw from the outside of the cabinet box. (Remember your recessing these, so the shelves must be put in BEFORE the box gets recessed into the hole if they are fixed shelves.) Since I was keeping the project simple, I chose to paint the exposed edge of the shelf to match the cabinets. Another way to finish the edge of the shelf would have been to cut the shelf depth 3/4″ short and attach 1×2 to the front, but there would have been a seam where the 1×2 meets the shelf material. If I had wanted to spend more money, I could have opted to make a solid wood shelf with a finished front edge. There is also the option of glue-on edge banding.
With the cabinet boxes assembled, I placed each one into its hole, recessed back from the wall 3/4″, and attached them with screws to the studs.
Then I cut the 1×2 for the face frame and attached. Then I measured for the doors. I chose to purchase doors for painting. I took the width and the height of the opening, adding 1″ for overlay, and divided the width by two since I wanted two doors per cabinet. The rule of thumb on whether you need one door or two is that if the width is 24″ or under you can generally get by with one door and if the width is wider than 24″ you will want two doors. Otherwise the door is spanning too much space and can be prone to warping (depending on how the door is made) and will be quite heavy on the hinges.
With doors on order, I painted the face frames, added painted finish trim, and put the base trim back on. I ordered my doors with hinges, so upon their arrival I could just paint them and attach to the face frame. Another option is to purchase and set the hinges yourself.
The result is storage for a room that doesn’t take up floor space, in this case on a wall that was already hard to place furniture because of the low sloping ceiling.
Looking at it now, I wonder why it wasn’t always designed that way. A few weekends of work and for under $400 I now have about 20 additional square feet of very accessible storage in my upstairs bedroom.


Hi, where did you get the doors from?
Hi Mike, these doors actually came from a place online called nakedkitchencabinetdoors.com. Because these would be tucked away in the upstairs bedroom and painted, I didn’t need to go for the more expensive solid wood doors that I might choose for a more prominent room like a kitchen. I wanted inexpensive, paint-ready mission style doors (square with flat center panel), that would come with the hinges already attached, and these fit my requirements. You can also order them pre-primed, but I chose to do the priming myself to save money. Hope this helps! Kasey